Archival Packager takes the files you have received and packs them into a form that can be kept for the long term. The result is called a “package”.
Before you start
Your original files are never changed. The application only reads them. Packages are written to a separate folder that you choose.
There are two kinds of package.
- SIP (Submission Information Package) — the records as received, packed together with a record of what was received, when, and how many files
- AIP (Archival Information Package) — built from a SIP and prepared for long-term preservation. For example, images also get a copy in a format suited to preservation (TIFF)
Usually you create a SIP first, check it, and then create the AIP.
1. Install
Which computers it runs on
- Windows — Windows 10 (version 2004 or later) or Windows 11, 64-bit
- Mac — macOS 12 or later
Have free space of two to three times the size of the records. A package holds a copy of the records, and an AIP also holds the preservation copies of images. The virus scan needs several hundred MB more for its data.
If your work computer does not let you use the Store or install applications, show For IT staff at the end of this page to the person who looks after your computers.
Windows
- Open the Microsoft Store page
- Press “Get” (or “Install”)
- When “Archival Packager” appears in the Start menu, you are done
Updates arrive automatically, like any other Store app. To remove it, right-click its icon in the Start menu and choose “Uninstall”.
Mac
- Open the download page
- Under “Assets”, click the file whose name ends in
.dmgto download it - Open the downloaded file. A window appears; drag the application icon in it into the “Applications” folder
- Open Archival Packager from the “Applications” folder
The Mac version does not update itself. When a new version comes out, download it the same way and replace the one in “Applications”. To remove it, move Archival Packager from “Applications” to the Bin.
Either way, packages you have made are not removed.
Opening it for the first time
The first start can take a few minutes. The window may look as if nothing is happening; the application is preparing itself. From the second time on it opens straight away.
The first time, your Mac asks whether you want to open “an app downloaded from the Internet”. Press “Open”. The application has been checked by Apple (notarised), so this is the only question you will see.
The first screen
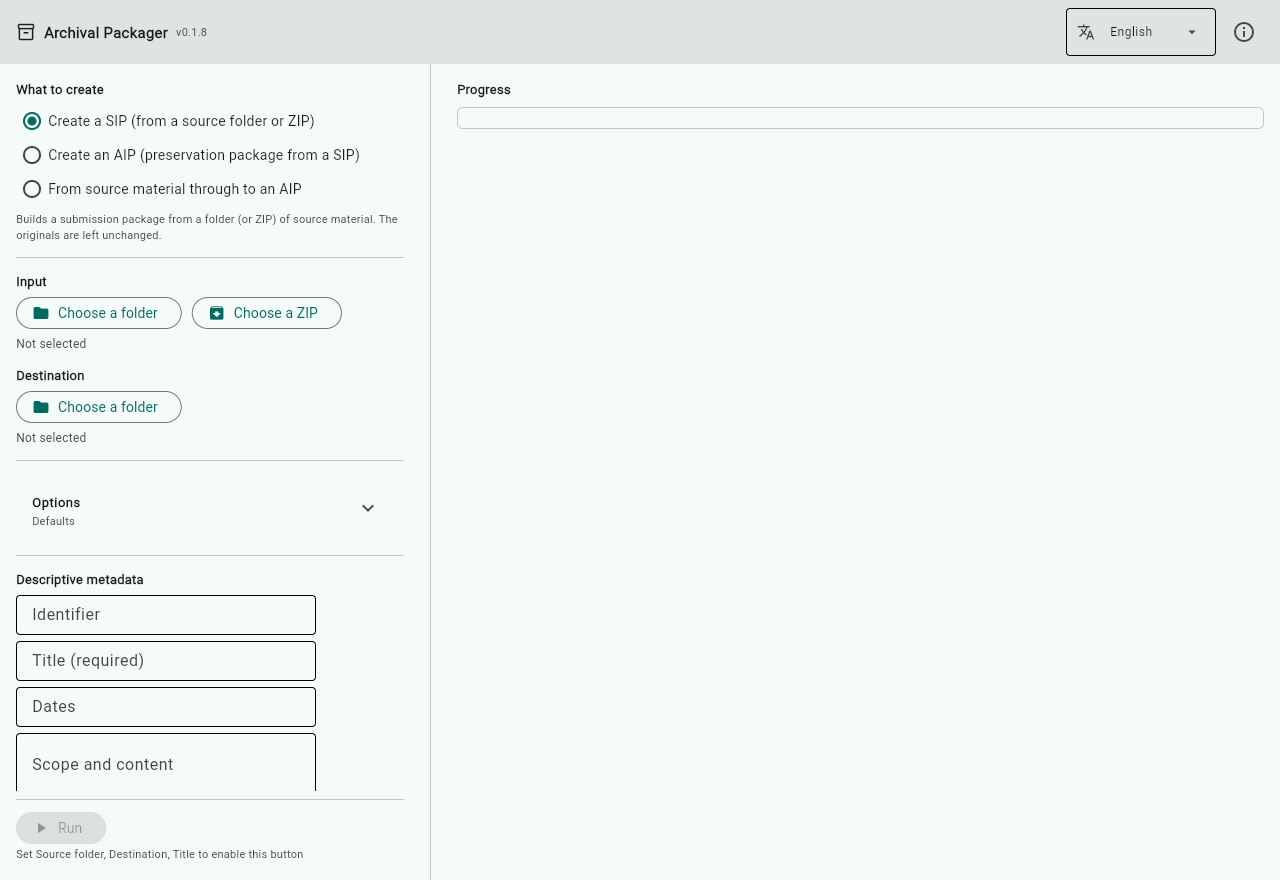
To switch the language, use the menu at the top right (it shows the current language). Your choice is remembered next time.
The version number is shown at the top left, next to the name (for example v0.1.8). Please include it when you ask a question.
2. Create a SIP (submission package)
With sound. The red dot shows where the mouse clicks. The text below is what the video says.
First, let’s create a Submission Information Package, or SIP.
Under “What to create”, choose “Create a SIP”.
Under “Input”, press “Choose a folder” and pick the folder of records you received. A folder picker opens; it is skipped in this video.
Next, choose a destination for the package. Use a different place from the records themselves.
The identifier is a name for this transfer. It becomes the name of the package folder.
The title is required. It is the name of the group of records.
Open “Options” to choose extras such as a virus scan.
Press “Run”. Progress appears on the right.
When it finishes, it says the SIP was created. Any files that need a closer look are listed here.
Press “Look inside” to see what went into the package.
The Files tab shows each file’s format and size. The original files have not been changed.
More details
- If you received the records as a ZIP file, use “Choose a ZIP” under “Input”
- If “Run” cannot be pressed, the line under the button tells you what is still missing
- If you choose the folder of records (or a folder inside it) as the destination, a note in red appears under “Destination” and “Run” cannot be pressed. This keeps anything from being written into the originals
- Files that need a closer look are those in which a virus was found, those that seem to contain personal information, those whose format could not be identified, and those whose extension does not match their content. The application never deletes any of them. What to do with them is your decision. Under the list, each kind comes with a line on what to do next
Options
Nothing is selected at first. The defaults work as they are.
| Option | What it does |
|---|---|
| Run a virus scan | Checks the files for viruses. Needs a one-time download first (see below) |
| Scan for personally identifiable information (PII) | Looks for things that look like e-mail addresses or phone numbers and lists them. Nothing is removed |
| Sanitize file names | Fixes characters that cannot be used and names that are too long. The original names are kept in the record |
| Wrap the output as a BagIt bag | Uses a layout that libraries and archives commonly use for transfers |
| Serialize the output as a ZIP | Turns the finished package into one ZIP file, handy for handing it over |
Before using the virus scan, press “Download / update definitions” under “Virus definition database” once. It downloads the data used to recognise viruses (several hundred MB). This section appears when the virus scan is selected. If you run without the data, no scan is done and it is recorded as “skipped” — never as “nothing found”.
3. Create an AIP (preservation package) and check it
With sound. The text below is what the video says.
Next, let’s turn the SIP into an Archival Information Package, or AIP.
Under “What to create”, choose “Create an AIP”.
For the input, choose the SIP folder we just created. Right after creating a SIP, pressing “Build an AIP from this SIP” under the result does the same.
Choose a destination. The descriptive metadata comes from the SIP, so there is nothing to type again.
Press “Run”. The application checks that no file has changed since it was received, and copies images into a format suited to long-term preservation.
When it finishes, press “Look inside”.
The Workflow tab lays out what was done, stage by stage, from left to right. A green tick means no problems were found.
Press a stage to see the tools used and how many files it covered.
In “Normalization”, two images were copied into the TIFF format. The original images are kept as well.
“Fixity check” records that each file was compared with the record made when the SIP was created, to confirm nothing had changed.
The Preservation events tab lists the same records one by one. The application writes them automatically, so there is no need to keep a separate log by hand.
More details
The “Look inside” screen has five tabs.
| Tab | What it shows |
|---|---|
| Overview | Which kinds of file, how many, and when the package was made |
| Preservation events | When, what, with which tool, and with what result — one line per event |
| Workflow | The same records grouped into stages |
| Files | Each file’s format, size and virus scan result |
| Raw data | The files inside the package themselves |
Besides the green tick, a stage in the Workflow tab may show:
- “… to check” — some files in that stage need a closer look. Press the stage to see which
- No records — nothing was recorded for that stage, for example when the virus scan was not selected
Right after creating a SIP, you can press “Build an AIP from this SIP” under the result. It switches to “Create an AIP” with the new SIP as the input.
You can also create the SIP and the AIP in one go: under “What to create”, choose “From source material through to an AIP”. If you want to check something at the SIP stage, though, it is safer to do them separately.
If something goes wrong
- “Run” cannot be pressed — the line under the button says what is missing. If there is a note in red under “Input” or “Destination”, follow it
- “The folder you chose is not a SIP” — under “Create an AIP”, you chose a folder of records, or the destination folder that holds the SIP. Choose the SIP folder itself (the one with a folder called objects inside)
- The first start is slow — only the first time; it takes a few minutes
- The virus scan says “skipped” — press “Download / update definitions” once
- Files inside the package will not open — the application only lists them. Use “Show in folder” and open them with your usual applications
- Not sure what to hand over — inside the destination, the folder with the same name as the identifier is one package. Hand over that whole folder. To make it a single file, create it again with “Serialize the output as a ZIP”
For every part of the window, with screenshots, see Using the window. For more detail, see the full usage guide. What the application cannot do is listed under Known limits in the README.
Questions: nakamura@hi.u-tokyo.ac.jp — please include the version number (top left of the window) and whether you use Windows or a Mac.
For IT staff
Information for deciding whether the application may be installed on work computers.
- Everything is processed on the computer. No records and nothing typed in are sent to the developer or anyone else. There is no usage tracking, no error reporting and no update check
- It connects to the network for one thing only: when the user fetches the
virus scan data, it downloads it from ClamAV (
database.clamav.net). If that is blocked, the virus scan is recorded as “skipped” (never as “nothing found”). Everything else works offline - It never writes to the originals. It only reads them, and writes packages to a separate place the user chooses
- Windows: distributed through the Microsoft Store (Store ID
9N6XJD7THHPZ, publisher Satoru Nakamura), so it is reviewed and signed by Microsoft - Mac: signed with an Apple Developer ID and notarised (checked by Apple for malware)
- The tools used for identification and scanning (Siegfried, ClamAV) are bundled. Nothing else needs to be installed
- The source code is public on GitHub (MIT licence)
See the privacy policy for details.